About Me

My photo
What can I say?? I just love to bake!! Ever since I would go to Grandma's house as a little girl and bake highlight cakes or help Ninny make her famous vanilla cookies, I've been obsessed with baking! Not only from recipe books, but freestyle too! With a father as a chef, i suppose it is in my genes! Some of my favourite memories from growing up were those moments after dinner when my dad would get his sweet tooth pang and have me help him whip up a batch of toffee fruit kebabs, or irish caramels! I used to love how he never followed recipes, he always just knew what ingredients worked with one another and how to play with quantities. So, from an early age, i had learnt from the master and i was well on my way to bake on my own! When i was 7 years old, i used to bake chocoloate cakes to sell to the mothers of my friends when they came to watch our Saturday morning minkey hockey games! Before i knew it, i was being commissioned from my school teachers to bake cakes for them at $2 a pop! This blog holds just a few of my favourite tried and tested recipes which I've thoroughly enjoyed both baking and eating! So enjoy!!

Wednesday, 19 January 2011

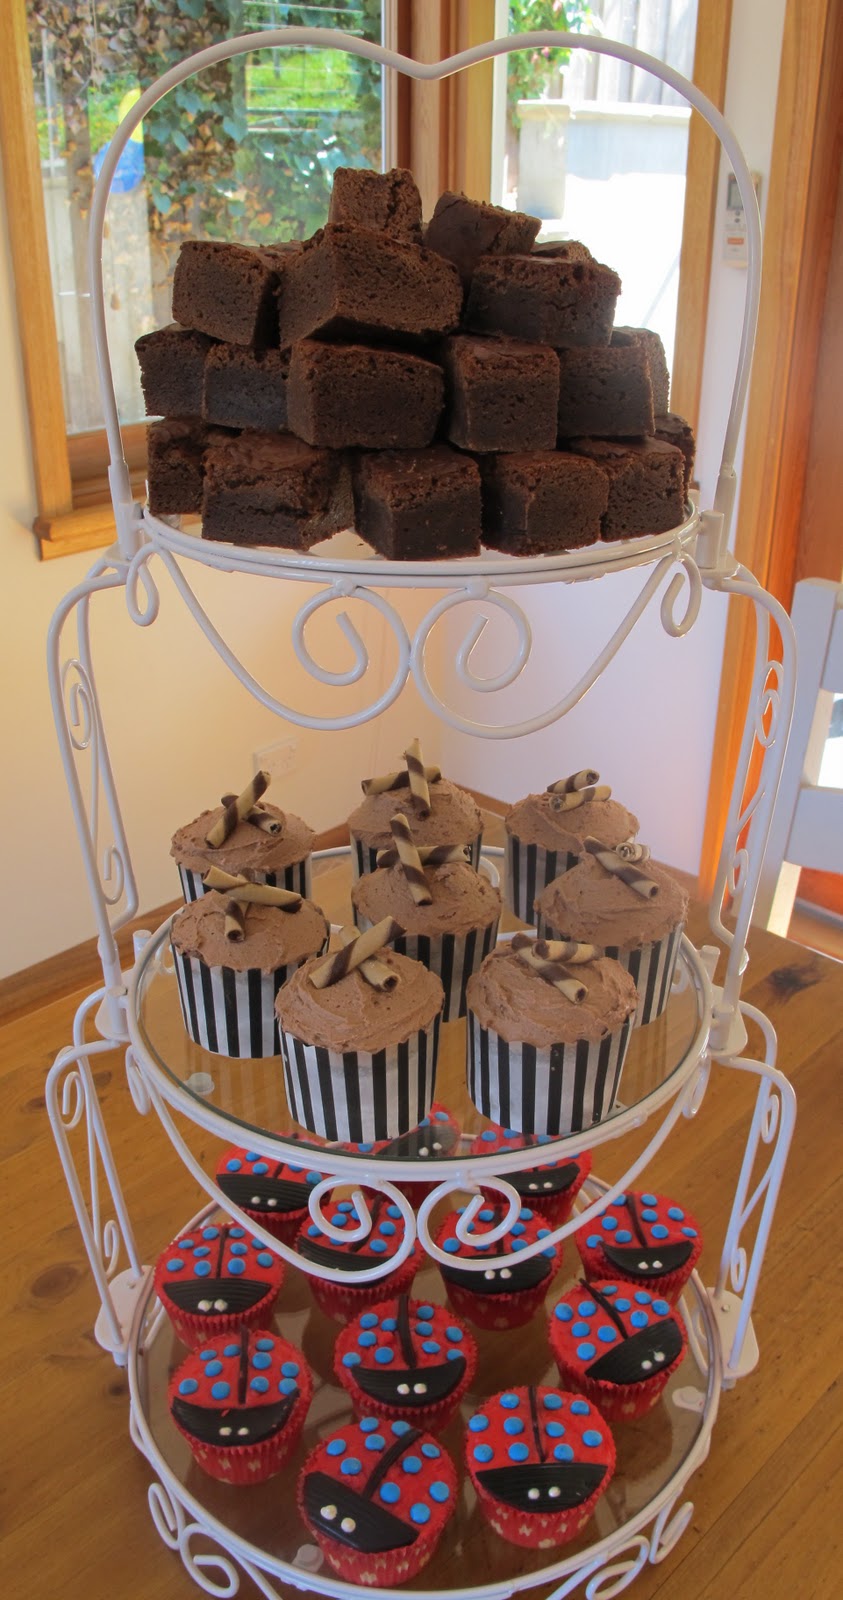
My Housewarming Party Platter

Chocolate Nutella Filled Cupcakes... recipe in the 2010 blog entries


Lady Bird White Chocolate Cupcakes... recipe in post below


Chocolate Brownies...

The Complete Party Platter....

White Chocolate Mud Cake Ladybird Cupcakes


We had our housewarming party last Sunday, and not that I need an excuse to bake, I couldn't wait to find the perfect occasion to showcase these lovely ladybirds!  They went down a treat and I had so much fun making them, you should really give them a go for yourselves!  

Cooking Time: 20 mins
Preparation Time: 30 mins
Serves: 12

Ingredients:
 - 125g butter, chopped coarsely
 - 80g white chocolate, chopped coarsely
 - 1 cup castor sugar
 - 1/2 cup milk
 - 1/2 cup plain flour
 - 1/2 cup SR flour
 - 1 egg

Method:
1)  Preheat oven to 170C, 150C fan-forced.  Line a twelve-hole muffin tin with paper cases.

2)  Stir butter, chocolate, sugar and milk in a saucepan over a low heat until smooth.  Transfer mixture to a medium bowl and cool for 15 minutes.

3)  Whisk sifted flours into the chocolate mixture and then mix in the egg.

4)  Drop 1/4 cup of mixture into the paper cases.  Bake for around 20 minutes.  Place on a wire rack to cool.


Simon's Stegosaurus Cake!

The next birthday in the 2011 cake calendar was of course my partner, Simon, who at turning 34, chose this cake himself!  HAPPY BIRTHDAY TO SIMON for January 14th! xx

The Train Cake!!

Remember when you were little and (one of) the most exciting things about your birthday was choosing your very own cake out of the Women's Weekly Kids Cake Book?!  My goodness, i remember spending hours upon hours, even days trying to choose the perfect cake!  Some of them really are pretty incredible and i've decided to spend 2011 re-creating as many of the treasured favourites I can.

So, the first birthday in my diary for 2011 is my grandfather (fondly known as Darl), and I didn't even need to think twice about which cake he'd like.... after all, it had to be the most grand of the lot considering he was turning 90 years old on January 13th!!  The Train Cake had his name written all over it!  And he absolutely loved it too!!

The cake itself was made from an old Godfrey family recipe - Highlight Cake (also known as Madeira Cake or Grandma's cake).  It is the perfect base for any of these novelty cakes as it not only tastes YUMMY it's quite dense and easy to play with.

Highlight Cake Recipe to follow shortly...

So, without further ado, may I introduce to you.... The Train Cake!!


Thursday, 16 December 2010

Walnut Brittle

A little twist on the American favourite, Peanut Brittle!


Ingredients;
 - 2 cups (440g) sugar
 - ¼ teaspoon cream of tartar
 - ½ cup (125ml) water
 - 2 tablespoons golden syrup
 - 60g butter, chopped
 - 1½ cups walnuts
 - ½ teaspoon bicarbonate of soda
 - 150g dark chocolate
Method:
 1 - Line a baking tray with non-stick baking paper.
2 - Combine the sugar, cream of tartar and water in a medium saucepan. Stir over a low heat until sugar is dissolved. Brush down sides of pan with a pastry brush dipped in water to dissolve any sugar crystals stuck on the side of the pan.

3 - Bring to boil; boil, uncovered, for about 10 minutes or until the mixture turns golden brown and reaches 149°C on a sugar thermometer. This is called the hard crack stage.

4 - Remove the pan from the heat and stir in golden syrup and butter, return pan to heat and boil for a further minute. Remove the pan and add combined nuts and soda; stir until well combined.

5 - Pour into lined baking tray; cool 10 minutes. Mark into small squares; cool completely. Break into pieces along lines once cool.

Caramel Nut Truffles

Ingredients:
 - 60g butter
 - ½ cup caster sugar
 - 1 tablespoon golden syrup
 - ¾ cup sweetened condensed milk
 - ½ teaspoon vanilla extract
 - ½ cup unsalted peanuts, chopped coarsely
 - ¼ cup ground hazelnuts or almonds
 - 100g dark chocolate, chopped
 - 50g dark chocolate, extra, melted
Method:
1)  Combine the butter, sugar and golden syrup in a small saucepan; stir constantly over low heat until sugar is dissolved. Stir in condensed milk, bring to the boil, reduce heat, cook, stirring constantly, for about 6 minutes or until mixture turns a caramel colour.

2)  Remove from heat; stir in vanilla, peanuts and hazelnuts; mix well. Transfer mixture to medium heatproof bowl; cool mixture about 10 minutes.

3)  Roll rounded teaspoons of mixture into balls. Refrigerate on a tray until firm.

4)  Combine chocolate in top of double saucepan, stir over simmering water until melted. Dip balls in chocolate mixture using a fork or skewer, lift balls from chocolate, allow excess chocolate to drip away.

5) Place on a tray lined with aluminium foil or baking paper. Refrigerate until chocolate is set.

6)  Drizzle extra melted chocolate decoratively over top of balls. sprinkle on extra crushed nuts, if desired. Refrigerate until set.


**See below for the White Chocolate Snowball Truffle recipe!

White Chocolate Snowball Truffles

Number five of the Christmas Collection is White Chocolate Snowball Truffles!  Truffles make the perfect gift at christmas time because even though they're a little fiddly to make, they keep well, travel well and best of all, present themselves well! 
 
Preparation Time: 20 mins
Cooking Time: 30 mins
Serves: 40 truffles
 
Ingredients:
 - ¼ cup (60ml) cream
 - 30g butter
 - 250g white chocolate Melts, chopped finely
 - ½ cup (70g) slivered almonds, toasted
 - 1 tablespoon amaretto (almond liqueur)
 - 250g white chocolate Melts, melted, extra
 - 1 cup (90g) desiccated coconut
Method:
1 - Toast your slivered almonds in a moderate oven for 8 mins, or until golden.
 
2 - Bring the cream and butter to the boil in a small pan.
 
3 - Place the chopped chocolate in a medium bowl then add the cream mixture and stir together until melted.

4 - Stir in the almonds and liqueur then cover and refrigerate, stirring occasionally, for about 30 minutes or until the mixture begins to thicken but not set.
 
5 - Roll level teaspoons of mixture into balls and place in a single layer on a tray; refrigerate until firm.

6 - Dip the truffles in the extra melted chocolate, gently shaking off any excess chocolate. Roll the wet truffles in the coconut, return to the tray and refrigerate until set.