About Me

My photo
What can I say?? I just love to bake!! Ever since I would go to Grandma's house as a little girl and bake highlight cakes or help Ninny make her famous vanilla cookies, I've been obsessed with baking! Not only from recipe books, but freestyle too! With a father as a chef, i suppose it is in my genes! Some of my favourite memories from growing up were those moments after dinner when my dad would get his sweet tooth pang and have me help him whip up a batch of toffee fruit kebabs, or irish caramels! I used to love how he never followed recipes, he always just knew what ingredients worked with one another and how to play with quantities. So, from an early age, i had learnt from the master and i was well on my way to bake on my own! When i was 7 years old, i used to bake chocoloate cakes to sell to the mothers of my friends when they came to watch our Saturday morning minkey hockey games! Before i knew it, i was being commissioned from my school teachers to bake cakes for them at $2 a pop! This blog holds just a few of my favourite tried and tested recipes which I've thoroughly enjoyed both baking and eating! So enjoy!!

Thursday, 16 December 2010

Walnut Brittle

A little twist on the American favourite, Peanut Brittle!


Ingredients;
 - 2 cups (440g) sugar
 - ¼ teaspoon cream of tartar
 - ½ cup (125ml) water
 - 2 tablespoons golden syrup
 - 60g butter, chopped
 - 1½ cups walnuts
 - ½ teaspoon bicarbonate of soda
 - 150g dark chocolate
Method:
 1 - Line a baking tray with non-stick baking paper.
2 - Combine the sugar, cream of tartar and water in a medium saucepan. Stir over a low heat until sugar is dissolved. Brush down sides of pan with a pastry brush dipped in water to dissolve any sugar crystals stuck on the side of the pan.

3 - Bring to boil; boil, uncovered, for about 10 minutes or until the mixture turns golden brown and reaches 149°C on a sugar thermometer. This is called the hard crack stage.

4 - Remove the pan from the heat and stir in golden syrup and butter, return pan to heat and boil for a further minute. Remove the pan and add combined nuts and soda; stir until well combined.

5 - Pour into lined baking tray; cool 10 minutes. Mark into small squares; cool completely. Break into pieces along lines once cool.

Caramel Nut Truffles

Ingredients:
 - 60g butter
 - ½ cup caster sugar
 - 1 tablespoon golden syrup
 - ¾ cup sweetened condensed milk
 - ½ teaspoon vanilla extract
 - ½ cup unsalted peanuts, chopped coarsely
 - ¼ cup ground hazelnuts or almonds
 - 100g dark chocolate, chopped
 - 50g dark chocolate, extra, melted
Method:
1)  Combine the butter, sugar and golden syrup in a small saucepan; stir constantly over low heat until sugar is dissolved. Stir in condensed milk, bring to the boil, reduce heat, cook, stirring constantly, for about 6 minutes or until mixture turns a caramel colour.

2)  Remove from heat; stir in vanilla, peanuts and hazelnuts; mix well. Transfer mixture to medium heatproof bowl; cool mixture about 10 minutes.

3)  Roll rounded teaspoons of mixture into balls. Refrigerate on a tray until firm.

4)  Combine chocolate in top of double saucepan, stir over simmering water until melted. Dip balls in chocolate mixture using a fork or skewer, lift balls from chocolate, allow excess chocolate to drip away.

5) Place on a tray lined with aluminium foil or baking paper. Refrigerate until chocolate is set.

6)  Drizzle extra melted chocolate decoratively over top of balls. sprinkle on extra crushed nuts, if desired. Refrigerate until set.


**See below for the White Chocolate Snowball Truffle recipe!

White Chocolate Snowball Truffles

Number five of the Christmas Collection is White Chocolate Snowball Truffles!  Truffles make the perfect gift at christmas time because even though they're a little fiddly to make, they keep well, travel well and best of all, present themselves well! 
 
Preparation Time: 20 mins
Cooking Time: 30 mins
Serves: 40 truffles
 
Ingredients:
 - ¼ cup (60ml) cream
 - 30g butter
 - 250g white chocolate Melts, chopped finely
 - ½ cup (70g) slivered almonds, toasted
 - 1 tablespoon amaretto (almond liqueur)
 - 250g white chocolate Melts, melted, extra
 - 1 cup (90g) desiccated coconut
Method:
1 - Toast your slivered almonds in a moderate oven for 8 mins, or until golden.
 
2 - Bring the cream and butter to the boil in a small pan.
 
3 - Place the chopped chocolate in a medium bowl then add the cream mixture and stir together until melted.

4 - Stir in the almonds and liqueur then cover and refrigerate, stirring occasionally, for about 30 minutes or until the mixture begins to thicken but not set.
 
5 - Roll level teaspoons of mixture into balls and place in a single layer on a tray; refrigerate until firm.

6 - Dip the truffles in the extra melted chocolate, gently shaking off any excess chocolate. Roll the wet truffles in the coconut, return to the tray and refrigerate until set.
 

Tuesday, 14 December 2010

Coconut Ice!

Post #4 of the Christmas collection... Coconut Ice!  This recipe is completely idiot proof, even a 2 year old could make it - so go on, give it a go!  If you've not worked with food colouring before, then a helpful tip is to pour a little bit of colouring into the lid and then add it to the mixture drop by drop.  You don't want too much pink... it's not a good look!  Keep is light and classic!
 
Preperation Time:  15mins
Cooking Time: 3 hours
Serves: 40 pieces
 
Ingredients:
 - 5¼ cups (840g) icing sugar
 - 2½ cups (200g) desiccated coconut
 - 395g can sweetened condensed milk
 - 1 egg white, beaten lightly
 - pink food colouring
Method:
1)  Line a deep 19cm-square cake pan with baking paper.

2)  Sift the icing sugar into a large bowl then stir in the coconut. 
 
3)  Add the condensed milk and egg white.  Mix until completely incorporated and you have a dough like consistency.

4)  Divide the mixture in half; tint half with pink colouring.
 
5)  Press the pink mixture into pan then top with the white mixture. Cover and refrigerate for about 3 hours or until set before cutting into squares.
 
MERRY CHRISTMAS! xx


Chocolate Coconut Tart

This one isn't for the faint-hearted!  It's base is wonderfully crisp and coconutty and the filling is rich and creamy - a superb combination if you ask me!  I had been waiting for the perfect opportunity to test this recipe out, so when my dad asked me to whip up a dessert for his luncheon earlier today, i knew exactly what i was going to make!  Unfortunately we didn't have enough time to allow for the full 6 hours to set, but it was still managable and of course very yummy after about 4 hours.  (If you can, keep refrigerated for at least 6 hours before serving).

Preperation Time: 20 mins
Cooking Time:  40 mins
Serves: 10

Ingrediants:
 - 1 cup desiccated coconut
 - 1 egg white, lightly beaten
 - 1/4 cup castor sugar
 - 300ml thickened cream
 - 300g dark chocolate
 - 4 egg yolks
 - 2 tbs Baileys, Kahlua or Tia Maria

Method:
1)  Preheat oven to 120'C (fan forced).  Grease a 20cm non stick, springform pan.

2)  Combine coconut, egg white and sugar in a bowl then press mixture into the pan, evenly covering the base and 5cm up the sides.

3)  Bake, uncovered for about 40mins or until golden.  Allow to cool.

4)  Heat the cream in saucepan until almost boiling, then add the chopped chocolate.  Stir these together until the chocolate melts and you have a smooth consistency.  Cool slightly, then whisk in your egg yolks and liqueur.

5)  Pour the chocolate filling into your prepared coconut shell then refrigerate for at least 6 hours (or until set).

6)  Cut into thin wedges to serve.

As my friend Ashley would say....'Simples!'

Monday, 13 December 2010

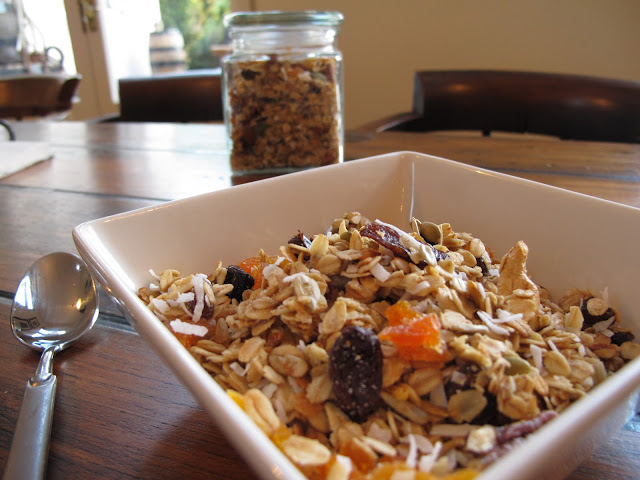
Homemade Toasted Muesli

When I recently moved back home to Tasmania I never thought I'd see the day where I actually missed British food!  As hard as I tried, I just couldn't find a museli I liked as much as any of the British brands I had become accustomed to over the past 6 years... so what's a girl to do?  Make her own of course!  Here's a really simple, healthy recipe for you to try yourself.  The beauty of it is, you can put whatever you like in and keep all the nasties out!

Preparation Time: 5 mins
Cooking Time: 25 mins
Serves: about 20 small bowls

Ingredients:
 - 8 cups rolled oats
 - 2 cups mixed, unsalted nuts of your choosing (I think almonds, cashews, pecans and hazelnuts work wonderfully)
 - 1/2 cup mixed seeds (I like to use pumpkin and sunflower seeds)
 - 1 cup chopped dried fruit (I like to use apricots, cranberries and raisins)
 - 1/2 cup moist coconut flakes
 - 2 tsp vanilla essence
 - 5 tbs honey
 - 1/2 cup sunflower oil

Method:
1)  Preheat oven to 150'C

2)  In a large bowl, mix together your oats and nuts.

2)  In a mixing jug, mix together your oil, vanilla and honey.

3)  Pour your wet ingredients into the oat mixture and stir to combine.

4)  Pour all of the mixture into a prepared baking tray, lined with baking paper.  Spread evenly to allow even toasting.

5)  Bake in the oven for about 12-15mins, then remove and stir through your dried fruit and coconut.  Return the tray to the oven for a further 10-12 mins, or until the oats turn slightly golden.

6)  Allow to cool completely before serving and storing in airtight jars for up to 4 weeks.

Sunday, 12 December 2010

Almond Nougat

Number 3 of the Christmas series had to none other than..... Almond Nougat!  Need I say more??  Nougat is one of my all time favourite sweeties and I actually can't beleive I hadn't attempted to make this sooner!  I think I was put off by people telling me how hard it is to perfect, but honestly, if you have all your ingredients prepared and ready; a candy thermometer and some rice paper to hand, then this recipe is easy peasy.  Honest!  Just follow these simple steps and have a little Christmas faith!

Preparation Time: 10 mins
Cooking Time:  20 mins + 6 hours to set
Serves:  Makes around 40 pieces.

Ingredients:
 - 4 sheets of edible rice paper (cut to the size of your baking tray - 15.5 x 23.5cm)
 - 200g blanched almonds
 - 560g (2 1/2 cups) sugar
 - 80ml (1/3cup) water
 - 1 500g jar of glucose syrup
 - 2 eggs whites, at room temperature
 - 1tsp vanilla essence

Method:
1)  Preheat oven to 170'C.

2)  Line your baking tray with baking paper, allowing it to overhang at the sides.  Then lay 2 sheets of rice paper in the base of your prepared tray. 

3)  Spread the almonds evenly over the rice paper and toast in your preheated oven for 7-10mins, or until light golden.  Leave them to cool slightly for 5mins then chop roughly and set aside.

4)  Using a free standing mixer, beat your egg whites until firm peaks form.  Leave in the bowl, ready for later use.

5)  Fill your sink with roughly 10cm of cold water.

6)  Place the sugar, water and glucose syrup in a medium sized saucepan and put the pan over a medium-low heat.  Stir with a wooden spoon, brushing down the sides of the pan occassionaly with a pastry brush dipped in water, until the sugar dissolves.  This should take about 10 mins.

7)  Increase heat to high and bring the sugar mixture to the boil.  As soon as it starts to boil, reduce the heat to medium-high and boil, uncovered, without stirring.  You will need to place your candy thermomiter in the saucepan and keep an eye on the temperature.  As soon as the syrup reaches about 140'C, immediately remove the saucepan from the heat and place gently into the sink of cold water to cool the mixture rapidly.  This will take about 5 seconds, or until the bubbles subside.

8)  With your egg white mixture on medium speed, slowly pour in the hot syrup, in a thin, steady stream.  Don't pour the syrup down the side of the bowl or onto the whisk beaters as it may set before being incorporated into the egg whites.

9)  Once all the syrup is incorporated, whisk for a further 3 minutes or until the mixture becomes thick and glossy.

10)  Use a wooden spoon to stir in your chopped almonds and vanilla essence.  It is important to move quickly or the nougat will begin to set.

11)  Quickly pour the mixture into your rice paper lined baking tray, using a wet spatula to scrape down the side of the bowl and also to spread the mixture evenly into your pan.

12)  Place your remaining sheets of rice paper ontop of the nougat, pressing gently.

13)  Set aside to cool for about 6 hours, or until it's set!

14)  Lift the nougat from the pan and place on a cutting board.  Remove all the baking paper (but keep the rice paper on, as it's edible).  Use a serated knife in a sawing motion to cut the nougat crossways into 3cm wide pieces.

NOTES:  Nougat can be stored in airtight containers in a cool, dry place for up to 1-2 weeks, or in the fridge for up to 3 weeks.  If storing in the fridge, be sure to let the nougat come to room temperature before serving.


HAPPY CHRISTMAS!! xx

Nutty Biscotti

Ok, here's #2 of my Christmas collection... Nutty Bisocotti!  It's actually very easy to make and keeps really well, which is the perfect combination when putting together homemade yum yums for christmas presents!  You can get creative with this recipe and add whatever you fancy.  I used pistachio's, hazelnuts and almonds in mine, as that's what i had lying around my pantry at the time, but you could always throw in some chopped dark chocolate or glace cherries to give them a bit more 'Oumph!'

Preperation Time: 20 mins
Cooking Time:  50 mins
Serves:  Makes about 40

Ingredients:
 - 125g plain flour
 - 125g castor sugar
 - 1tsp baking powder
 - 2 eggs, lightly beaten
 - 25g almonds
 - 25g shelled hazelnuts
 - 35g shelled pistachio's
 - 2 tsp orange zest

Method:
1)  Preheat oven to 180'C

2)  Mix together the flour, sugar, baking powder, zest and nuts in a bowl.

3)  Make a well in the centre of your flour mix and pour in your lightly beaten eggs.

4)  Fold through until a sticky dough forms, then turn the mixture out onto a floured bench.

5)  Split the dough into 4 piles and using a little bit of extra flour, roll dough into 4cm length logs and place on a prepared baking tray, lined with baking paper.  Be sure not to place logs too close together on the tray as they will spread a bit in the oven.

6)  Bake for 30 mins then remove from the oven and set aside to cool for 10 mins.

7)  Once slightly cool, using a serrated knife cut the biscotti on an angle into 0.5cm slices and return to the baking trays.

8)  Turn the oven down to 140'C and cook for about 20 mins, turning teh biscotti once half way through.


** These can be stored in airtight containers for up to 3 weeks.

Christmas Gingerbread Owlee's!

With Christmas fast approaching, I thought I'd better start to get my festive cooking hat on and post some Christmassy treats for you to bake as gifts or for the Christmas table!  Here's post #1 of my Christmas collection... Gingerbread Owlee's!  They're SO easy to make and SO, SO much fun to decorate!!

Preparation Time: 15 mins
Cooking Time: 10 mins
Serves: about 25 cookies

Ingredients:
 - 350g plain flour
 - 1tsp ground ginger
 - 1/2 tsp ground cinnamon
 - 1/2 tsp ground cloves
 - 1tsp bicarb soda
 - 100g butter
 - 175g brown sugar
 - 1 egg
 - 4tbs Golden Syrup

Method:
1)  Mix together the flour, spices and bicarb soda.

2)  Rub in the butter with your fingers until it looks like breadcrumbs.

3)  Add the sugar.

4)  In a seperate bowl mix together the egg and golden syrup then add to the dry ingredients.

5)  Mix together until it forms a dough.  Tip the mixture out onto a clean surface and knead for a minute or two until it is smooth.

6)  Pre-heat oven to 180'C.

7)  Roll the dough to the depth of a pencil (about 5mm), then using a round cutter of your choosing, cut neat circles and place on baking tray.  Be sure not to place them too close as they spread slightly in the oven.

8)  Using some of the off cuts of dough, roll little balls in your palms and place two together like eyes (see picture below)


9)  Place a chocolate chip in the centre of each 'eye' ball and press gently.

10)  Cut almonds in half, lengthways and place below the eyes in the centre, to replicate a beak.

11)  Using the tip of a fork, gently press into the bottom of the cookie to create the best feathery look i could come up with!!  (Any other ideas are welcome!!)

11)  Bake in preheated oven for 10 mins or until golden.

12)  Let the owls cool slightly in their trays before transferring to a wire rack.

HAPPY CHRISTMAS!! xx


Saturday, 13 November 2010

Farmhouse Cookies

Preparation Time:  10mins
Cooking Time: 10mins
Serves: 30

Ingredients:
 - 1 cup butter (at room temperature)
 - 300g chocolate chips
 - 2 cups plain flour
 - 1 cup brown sugar
 - 1 tsp bicarb soda
 - 1 cup castor sugar
 - 250g grated cadbury milk chocolate
 - 2 cups rolled oats
 - 2 eggs
 - 1 tsp baking powder
 - 1 tsp vanilla
 - 1 cup chopped nuts (pecans, walnuts, hazelnuts... whatever you fancy!)

Method:
1)  Preheat oven to 180'C.
 
2)  In a freestanding mixer, cream together your butter and sugars. 

3)  Stir in the eggs and vanilla, then add flour, bicarb, baking powder and oats.

4)  Add chocolate chips, grated chocolate and nuts.

5)  Roll mixture into balls (slightly larger than teaspoon size) and place on a grease proof paper tray, 2 inches apart.

6)  Bake for 10 mins or until slightly golden.


Sunday, 31 October 2010

Creme Brierlie!

Cooking Time: 30 mins
Preparation Time: 20 mins
Serves: 6

Ingredients:
 - 6 egg yolks
 - 110g white sugar
 - 1 tsp vanilla essence
 - 2 1/2 cups thickened cream
 - 2tbs brown sugar

Method:
1)  Preheat oven to 150'C

2)  Beat egg yolks, 4 tablespoons of the white sugar and vanilla in a mixing bowl with an electric mixer until thick and creamy.

3)  Stir the cream in a medium saucepan over a low heat until it almost comes to the boil.  Remove from the heat and add cream to egg yolk mixture.  Mix to combine.

4)  Pour cream mixture into the top of a double boiler or a medium bowl set over a medium saucepan of simmering water.  Stir until mixture lightly coats the back of a spoon, then pour into your prepared dish(es).

5)  Bake for 30 mins or until just set.  Remove from the oven and cool to room temperature before refridgerating for 3 hours or overnight.

6)  Before serving, combine remaining white sugar with the brown sugar in a small bowl.  Sift the sugar mixture evenly over your custard (or individual dishes) and cook under a preheated griller for 2 minutes, or until the sugar caramelises.  Remove from the heat and cool for 10mins before serving.


Monday, 18 October 2010

Brooklyn Blackout Cake

Another birthday in the family means.... another baking creation on the cards!  As it was my brother's birthday on Monday 18th October, I decided to go for something chocolatey (his favourite) and what better than this Brooklyn Blackout Cake (aka Chocolate fudgy cake!)  It looks wonderful once it's all dolled up and rearing to go in all it's layered glory - and between you and I, the chocolate custard filling is, quite simply, TO DIE FOR!  With this recipe, you can either make a whopper of a cake, or alternatively make a eight mini individual layered cakes as an alternative to the more 'streamlined' desserts at dinner parties!  (both are pictured below)

Preparation Time: 30 mins
Cooking Time: 25-30 mins
Serves: 10-12

Ingredients:
 - 100g unsalted butter, at room temperature
 - 260g castor sugar
 - 2 eggs
 - 1/4 tsp vanilla
 - 45g cocoa
 - 3/4 tsp baking powder
 - 3/4tsp bicarb soda
 - 170g plain flour
 - 160ml whole milk

(If you're making a large cake, you will need to double the cake mixture ingredients)

Chocolate Custard:
 - 500g castor sugar
 - 1tsp golden syrup
 - 125g cocoa
 - 200g corn flour
 - 85g unsalted butter
 - 1/2tsp vanilla

Method:
1)  Preheat oven to 170'C

2)  Beat butter and sugar until light and fluffy.

3)  Add the eggs, one at a time, then turn the mixer to slow and beat in the vanilla, cocoa, baking powder and bicarb soda until well mixed.

4)  Add in half the flour, then all the milk and finish with the remainder of the flour.  Mix well until it's all combined.

5)  Pour the mixture into your three prepared cake tins (20cm) and bake in your preheated oven for 25-30mins, or until firm to touch and a testing skewer comes out with moist crumbs stuck to it.

6)  Cool slightly before turning out on a wire rack.

7)  To make the custard, put the sugar, golden syrup, cocoa and 600ml water in a lrage saucepan and bring to the boil over medium heat, whisking occasionally.

8)  Mix the cornflour with 120ml water, then whisk into the cocoa mixture in the saucepan.  Bring this to the boil, whisking constantly.  Cook until it becomes very thick (this will take about 6-8 mins), then remove from the heat and stir in the butter and vanilla.  Pour your custard into a bowl and cover with cling film, leaving it to cool and for it to become firm.

9)  Once your cakes and custard are cool, place one cake on your cake stand and start spreading the custard onto it, spreading a 1cm layer evenly on top.  Stack another cake onto this and repeat until you have three layers.  Using the remaining custard, spread an even layer on top, also covering the sides of the cake (as pictured).  It helps if you have a palette knife to do this.  Decorate with crushed up flake or decorate as you see fit, after all, it's your creation!!


Tuesday, 12 October 2010

Mini Banana'n'Walnut & Nutty Apple Loaves

Preparation Time: 15 mins
Cooking Time: 20 mins
Serves: 8 mini loaves

Ingredients:
 - 115g butter, at room temperature
 - 115 castor sugar
 - 115g SR flour
 - 2 eggs
 - 50ml milk
 - 1tsp ground cinnamon
 - 2 ripe bananas
 - 1 tsp vanilla essence
 - 70g chopped walnuts
 - 1 apple, peeled and diced

Method:
 1)  Preheat oven to 180'C and lightly grease your mini loaf tin (or muffin tin).

2)  Cream together the butter and sugar with an electric mixer until light and fluffy.

3)  Sift in the flour and cinnamon, stirring to blend it all together.

4)  Add in your chopped walnuts and vanilla.

5)  Split you mixture into two even bowls.

6)  With a fork, mash your bananas to puree and mix into one bowl.

7)  Add your peeled and diced apple into the other bowl.

8)  Pour your mixture into your prepared loaf tins and top the apple loaves with slices apple and the banan loaves with a few walnuts.

9)  Bake for 20 mins, or until light and spongey to the touch.

Rosemary Focaccia with Sundried Tomato & Olives

Preparation Time: 30mins
Cooking Time: 55mins
Serves: 6

Ingredients:
 - 1 1/2 cups warm water
 - 1 1/2 tbs instant dried yeast
 - 1 tbs castor sugar
 - 3 cups strong bread flour
 - 2 tbs sea salt flakes
 - 1 tbs extra virgin olive oil
 - Approximately 1 cup rosemary sprigs
 - Approximately 1/2 cup sundried tomatos
 - Approximately 1/2 cup olives

Method:
1)  Place warm water into a large jug. Sprinkle over dried yeast and sugar, stir until yeast has dissolved (You may need to use your fingers to help dissolve some of the yeast). Cover with cling wrap and stand at room temperature for 10 minutes to activate yeast.

2)  Meanwhile place flour and salt into a large bowl, run a whisk through the flour to help mix through the salt and aerate the flour. Make a well in the centre of flour and pour in the yeast mixture and oil.

3)  Using a wooden spoon, gently stir until a soft dough forms. Turn dough out onto a lightly floured surface. Using your hands knead dough for 5 minutes or until smooth and elastic (lightly dust surface with more flour if dough starts sticking).

4)  Using hands gently press and pull dough with fingertips to cover the base of a large oiled deep oven tray, making sure dough is approximately 1cm thick.

5)  Cover tray with a tea-towel and place in a warm oven (about 75°C) with the door open for 30 minutes or until dough has doubled in height.

6)  Remove tray from oven. Preheat oven at 220°C/200°C (fan forced) for at least 10 minutes. Brush dough with extra oil. Gently press your fingertips into top of dough, about 1cm deep at 3cm intervals, randomly insert rosemary springs, sundried tomato and olives into holes.  Sprinkle with extra salt.
7)  Place a roasting dish filled with boiling water on bottom oven rack to create steam. Return tray to oven without tea-towel; cook for 25 minutes or until golden brown and top sounds hollow when tapped.

8)  Serve warm with extra olive oil for dipping or pesto if desired.

Monday, 11 October 2010

Fairy Toadstool Meringues!!

Preparation Time: 30 mins
Cooking Time: 45 mins
Serves: 20


Ingredients:
 -  4 egg whites
 -  250g castor sugar
 -  Pink food colouring

Method:
1)  Preheat oven to 150’C and line a large baking tray with baking paper.

2)  Whisk your egg whites until they form soft peaks and then slowly add in your sugar, one lot at a time, until all the sugar is incorporated and the egg mixture becomes white and glossy.

3)  Split your meringue mixture into two bowls and colour one bowl with a couple of drops of pink food colouring, folding the colouring into the mix until it's all blended in.

4)  Fill your piping bag with the white meringue mixture and pipe 15-20 cylinder shapes onto your baking tray, being sure to leave plenty of room at the top of each one for the 'fairy toadstool head' and also plenty of room between each one. (about 1.5inches is enough, as they tend to spread a bit in the baking process).  You will need a about 2tbs of white meringue mixture left over for decorating.

5)  Clean out your piping bag and replace it with pink meringue mixture.  Pipe a round pink 'mushroom' head on each stork.

6)  Using your left over white meringue mixture and a kebab skewer, dot small little spots on your fairy toadstool's - a very effective finishing touch!

7)  Bake for 35-40mins and allow to cool before turning out onto a wire rack.


Strawberry TART!

Preparation Time:  30 – 45 mins
Cooking Time:  25 mins
Serves: 10-12

For the filling:
 -   4 egg yolks
 -   70g Castor sugar
 -   3tbs plain flour
 -   300ml milk
 -   1/8tsp salt
 -   1 tsb Vanilla
 -   450g Strawberries
 -   5tbs Red currant jelly
 -   1tbs orange juice

For the shortcrust pastry:
 -   190g plain flour
 -   1/2tsp baking powder
 -   1/4tsp salt
 -   1tbs Castor sugar
 -   Grated rind of ½ orange
 -   85g Cold butter – cubed
 -   1 egg yolk
 -   3-4tbs whipping cream

**Or you could just buy some sweet shortcrust pastry from the supermarket – but my grandmother would call you a ‘cheat’!!  (As she did me, when I was short on time!!)

To make the custard filling:
1)  Beat the egg yolk and sugar together until it becomes thick and lemon coloured; then gradually stir in the flour.

2)  In a saucepan, bring the milk and salt to the boil then remove from the heat immediately. 

3)  Whisk in the egg mixture, then return to the stove to continue whisking over a moderate to high heat until it’s just bubbling.  You’ll want to cook this for 3 minutes to thicken the custard. 

4)  As soon as it starts to thicken, transfer the custard to a bowl.

5)  Add in your vanilla, then stir to blend in.

8)  Cover the custard in greaseproof paper to prevent a ‘skin’ forming.

To make the pastry:
1)  Preheat oven to 200’C

2)  Stir in your sugar and orange rind.

3)  Add the butter and cut in with a pastry blender until the mixture resembles course bread crumbs.

4)  Stir in the yolk and add just enough cream to bind the dough.

5)  Gather into a ball and wrap in grease proof paper, then refrigerate for an hour or so.

6)  On a floured surface, roll out your pastry to 3mm thick and transfer to a 10in/25s, pie tin.

2)  Or, if you’re using pre-made pastry, line your tray well until all the sides are covered and the base is tucked in nicely.  Run a knife along the top edge of the tray to trim any uneven ends.

3)  Prick the base of the pastry a few times with a fork and line with crumpled baking paper.  Fill the base of the tray with rice or pastry weights and blind bake for 15mins in your preheated oven. 

4)  After 15mins, remove rice/weights and baking paper and continue to bake for a further 6-8mins, or until golden.  Let the pastry cool completely.

To put it all together:
1)  Spread an even layer of your prepared filling in the pastry case, then arrange your berries on top.

2)  Melt your jelly and orange juice in pan to dissolve, then brush over your strawberries to glaze the tart.

3)  Eat it up and share with your favourite people!

Decorating the tart...


Greek Shortbread

I just LOVE this Greek Shortbread recipe!  They are SO delicious (albeit, a little naughty with all the butter content!) But still, very handy to have in the cupboard for when you have your girlfriends round for coffee. 

Preparation Time: 15 mins
Cooking Time:  15 mins
Serves: 20-25

Ingredients:
 -   115g Walnuts
 -   225g Unsalted butter
 -   115g Castor sugar
 -   1 tsp Vanilla
 -   225g Plain flour
 -  Icing sugar to dust

Method:
1)  Preheat oven to 180’C and line baking trays with grease proof paper.

2)  Grind your walnuts (or chop/bash until crushed but still a bit ‘nutty’)

3)  Transfer nuts to a bowl and mix in your butter until blended.

4)  Add in the sugar and vanilla and stir well to blend all ingredients.

5)  Sift in the flour and work into a dough.

6)  Now here’s the fun bit!  Take a large teaspoon amount of dough and form into a crescent  shape on your prepared trays.  You’ll want to leave a good inch between crescent’s, as they tend to spread slightly in the oven.

7)  Bake in preheated oven for 15 mins, or until just golden.

Chocolate & Hazelnut Meringues

Last Sunday we had all the family round for a lazy lunch and as per ususal I was on the dessert committee, made up of the team 'me, myself and I'!  I honestly don't mind it though (in fact, between you and I, I actually love being the sole dessert-er!)   Out of my three sweet creations, this one was the winner by a long shot!!  Who doesn't love something a bit chocolatey and nutty??

Preparation Time: 15 mins
Cooking Time: 45 mins
Serves: 12-15

Ingredients:
 -  6 egg whites
 -  400g castor sugar
 -  4tbs dark cocoa powder
 -  4tbs chopped hazelnuts
 -  3tbs chopped milk chocolate

 -  milk chocolate and chopped hazelnuts for decorating

Method:
1)  Preheat oven to 150’C and line a large baking tray with baking paper.

2)  Whisk your egg whites until they form soft peaks and then slowly add in your sugar, one lot at a time, until all the sugar is incorporated and the egg mixture becomes white and glossy.

3)  Fold in the cocoa powder, chopped hazelnuts and chocolate.

4)  Spoon the mixture into large dollops on your baking tray (bigger than a golf ball but smaller than a baseball!)

5)  Bake for 45mins, then turn off the heat and leave meringues to cool in the oven with the door ajar.

6)  When meringues are cool, melt down a few cubes of milk chocolate then drizzle on top of the meringues and top with chopped hazelnuts.

Thursday, 7 October 2010

Banana & Coconut Muff's

You know that feeling when you crave something a bit 'naughty' but don't want to blow the diet??  Well this recipe should do the trick!  They're so easy to make and don't taste 'healthy' at all!  You can vary the recipe to your liking, but mine were banana and coconut filling with granola sprinkled on top.  Alternatively, you could use the same muffin recipe and add apple & cinnamon with granola or blueberry or raspberry or... whatever you like, really!! 

Cooking time:  20 mins
Preperation time:  10 mins
Serves: 6 big fat boy serves or 12 normal

Ingredients:
 - 3 ripened bananas
 - 1 cup brown sugar
 - 1/2 cup coconut
 - 2 tbs low fat margarine
 - 1 egg, beaten
 - 2 cups SR flour
 - 2 tbs milk
 - 1/2 cup walnuts
 - Granola to decorate

Method:
 1)   Preheat oven to 180'C and lightly grease your muffin tins or line with muffin cases

2)  Beat together bananas and egg, then add in all remaining ingredients and mix well.

3)  Fill muffin tins 3/4 full with mixture.

4)  Bake for 20 mins, or until risen and lightly golden, and springy to the touch.

Wednesday, 6 October 2010

Susan's Famous Hummingbird Cake!

It was my mum's birthday recently and as I had said to her 'I will make you ANY cake you want', she requested her favourite - a Hummingbird Cake.  Seeing as all of my worldly possesions, (including my favourite cookbooks of course) were en route in a shipping container from London, I didn't have my tried and tested recipe to hand - however - Susan, my very good family friend saved the day with her EVEN BETTER recipe which she kindly gave me and allowed me to share with all of you!  It's so deliciously moist and is wonderful with the cream cheese frosting, sprinkled with lightly toasted coconut to serve... Have fun!

Cooking Time:  1 hr 15 mins
Preperation Time:  20 mins
Serves:  A lot!

Ingredients:
 - 3 cup SR flour
 - 1 cup good quality vegetable oil
 - 1 425g tin crushed pineapple
 - 1 225g tin mango (drained)
 - 3 bananas, mashed
 - 2 cups brown sugar
 - 1 tsp cinnamon
 - 1 tsp vanilla
 - 3/4 cup roughly chopped walnuts

Cream Cheese Frosting:
 - 225g cream cheese (cold)
 - 40g butter
 - 500g icing sugar
 - 1tsp vanilla
 - Toasted coconut flakes to decorate

Method:
1)  Preheat oven to 185'C and grease a large 25inch cake tin.

2)  In a bowl, mix together your crushed pineapple (with syrup), chopped mango, oil, vanilla and mashed bananas.

3)  In a seperate bowl, mix together flour, sugar, cinnamon and walnuts.

4)  Combine both bowls until all ingredients are mixed together, then pour into prepared cake tin.

5)  Bake for 1 1/4 hrs, or until lightly golden and springy to the touch. A testing skewer should come out with moist crumbs when inserted.

6)  To make the cream cheese frosting, beat together your cream cheese (cold from the fridge), butter, vanilla and icing sugar for about 5 minutes on high speed.  Be careful not to over beat, or else the frosting will be too runny.

7)  When your cake is cool, spread with the cream cheese frosting and sprinkle with toasted coconut flakes to decorate!

Tuesday, 31 August 2010

Happy Cakes!

Vanilla Cupcakes are my all time favourite!  They're a classic and lets be honest, everyone loves cupcakes... kids and adults alike!  This recipe makes a delightfully light and fluffy vanilla cupcake, not too buttery, just right!  You can have so much fun when it comes to frosting and decorating too!  I've posted a few snaps of my own designs, and be sure to watch this space and there will be many more to come!

Cooking Time: 20-25 minutes
Preperation Time: 15 minutes
Serves: 12

Ingrediants:
 - 120g plain flour
 - 140g caster sugar
 - 1½ tsp baking powder
 - A pinch of salt
 - 40g unsalted butter, at room temperature
 - 120ml whole milk
 - 1 egg
 - ¼ tsp vanilla extract

Vanilla Frosting:
 - 250g icing sugar, sifted

 - 80g unsalted butter, at room temperature
 - 25ml whole milk
 - A couple of drops of vanilla extract

- Hundreds and thousands or other edible sprinkles, to decorate

Method:
1)  Line a 12 hole cupcake tray with paper cases
2)  Preheat the oven to 170C/325F/gas mark 3.

3)  Put the flour, sugar, baking powder, salt and butter in a free-standing electric mixer with a paddle attachment (or use a hand-held electric whisk) and beat on slow speed until you get a sandy consistency and everything is combined.

4)  Gradually pour in half the milk and beat until the milk is just incorporated.

5)  Whisk the egg, vanilla extract and remaining milk together in a separate bowl for a few seconds, then pour into the flour mixture and continue beating until just incorporated (scrape any unmixed ingredients from the side of the bowl with a rubber spatula). Continue mixing for a couple more minutes until the mixture is smooth. Do not overmix.

6)  Spoon the mixture into the paper cases until two-thirds full and bake in the preheated oven for 20–25 minutes, or until light golden and the sponge bounces back when touched.

7)  A skewer inserted in the centre should come out clean. Leave the cupcakes to cool slightly in the tray before turning out onto a wire cooling rack to cool completely.

8)  Whilst the cupcakes are cooling, begin to make the frosting.  Beat the icing sugar and butter together in a free-standing electric mixer with a paddle attachment (or use a hand-held electric whisk) on medium-slow speed until the mixture comes together and is well mixed.


9)  Turn the mixer down to slow speed. Combine the milk and vanilla extract in a separate bowl, then add to the butter mixture a couple of tablespoons at a time.

10)  Once all the milk has been incorporated, turn the mixer up to high speed.

11)  Beat until the frosting is light and fluffy, at least 5 minutes. The longer the frosting is beaten, the fluffier and lighter it becomes.
12)  When the cupcakes are cold, spoon the vanilla frosting on top and decorate with hundreds and thousands - or go nuts with your own designs!!  See below for inspiration...!
 
Easter Bunny Cupcakes!        
 
                                                              Little Piggy Cupcakes

Tea Cup Cakes

Hooting Owls!
 
                                                                      Bumble Bee's!
 
                                                            Bon Voyage Cupcakes

It's a Boy!  Babyshower Cupcakes
 
                                                              Lilac Flower Cupcakes

The Ultimate Cupcake Assortment!

The Single Rose

Yellow Water Lillies

Flutterbies!

Good 'ol Pavlova

This is a great pavlova recipe and contrary to popular belief, it's actually very simple to make!!  Being Australian, there's always an occassion requiring a pav, so you can always make it a few days ahead of your BBQ and store it in an airtight container until you're ready for it.  Who doesn't love a good pav??

Cooking Time: 1hr (+ 3 hours or so / overnight to cool completely)
Preperation Time: 20 minutes
Serves: 8-10

Ingrediants:
 - 3 large egg whites
 - 175g castor sugar

For the topping:
 - 175ml double/whipping cream
 - 350g mixed berries (or any fruit of your choice to decorate)
 - A little icing sugar

Method:
1)  Preheat oven to 150'C

2)  Place the egg whites in a large CLEAN bowl and whisk until they form soft peaks and you can turn the bowl upside down without them sliding out (it's very important, though, not to over-whisk the egg whites because, if you do, they will start to collapse).

3)  When they're ready, start to whisk in the sugar, approximately 25 g at a time, whisking after each addition until all the sugar is in. Now take a metal tablespoon and spoon the meringue mixture on to the prepared baking sheet, forming a circle about 8 inches (20 cm) in diameter

4)  Then spoon round blobs next to each other so that they join up to form a circle all around the edge. Now, using the tip of a skewer, make little swirls in the meringue all round the edge, lifting the skewer up sharply each time to leave tiny peaks. Now place the baking sheet in the oven, then immediately turn down the heat to gas mark 1, 275°F (140°C) and leave it to cook for 1 hour.

5)  After 1 hour, turn the heat right off but leave the Pavlova inside the oven until it's completely cold. I always find it's best to make a Pavlova in the evening and leave it in the turned-off oven overnight to dry out. Some of the best bakers in the world believe that the secret of successful meringues of any sort is to let them dry out completely, which is what this method does perfectly. To serve the Pavlova, lift it from the baking sheet, peel off the paper and place it on a serving dish. Then just before serving, spread the whipped cream on top, arrange the fruit on top of the cream and dust with a little sifted icing sugar.

See, not that tricky after all!!

The Best Ever Chocolate Brownies!

These Chocolate Brownies have been tried and tested... many times!  I adore this recipe so much, it was even entered into an amateur brownie competition and it won with flying colours!!  

Cooking Time: 45 - 50 mins
Preperation Time: 20 mins
Serves: 12 - 15

Ingrediants:
 - 200 grams butter
 - 200 grams plain chocolate
 - 600 grams caster sugar (or 500grams if you want to bluff yourself about living more healthily... )
 - 2 teaspoons vanilla extract
 - 4 eggs -- large
 - 250 grams plain flour
 - 4 tablespoons cocoa

Method:
1)  Preheat oven to 180C, Gas 4

2)  Prepare a small rectangular roasting tin or oven proof dish approximately 8 x 12" (20 x 30cm). Grease or line with baking paper.

3)  Melt the chopped butter and chocolate over a pan of simmering water OR in a microwave. Cool slightly.

4)  Stir in the sugar and vanilla.

5)  Add the eggs, one at a time, stirring until well blended each time.

6)  Sift the flour and cocoa together, add to the mixture and beat for about 1 minute, until smooth.

7)  Pour into prepared tin, and bake for about 45 - 50 minutes. The mixture needs to be just cooked, so start testing with a cocktail stick at about 40 minutes - it should have moist crumbs, but not wet batter, still clinging to it.

8)  Cool in tin until completely cold before removing from tin.

I cut this size into 24 pieces (8 x 3), but it could easily make more smaller pieces as it is rather rich. Alternatively, you can make a half quantiity and bake in a 7 x 7" tin for about 40 minutes (test after 35 min)


Grandma's Pumpkin Scones

Pumpkin scones are my favourite kind!  This is my grandmas's recipe, but i'm willing to share it because they are THAT good!

Cooking Time: 15 minutes
Preperation Time:  15 minutes
Serves: 8-10

Ingrediants:
 - 3 cups self-raising flour
 - 1 cup boiled, mashed pumkin
 - 55 g butter
 - 1 egg
 - 1/2 cup castor sugar
 - 1/2 cup milk

Method:
 1)  Preheat oven to 180'C

 2)  Cream together the butter and sugar

 3)  Mix in the pumpkin and egg

 4)  Add milk, then slowly mix in the flour

 5)  Turn dough onto a floured board and knead for a minutes until you form a nice smooth ball

 6)  Roll out to 1.5 inch thick and cut out into small circles (either use a cookie cutter or just roughly cut with a butter knife)

7)  Place scones onto a tray covered with baking paper and brush each one with a little milk on top.

8)  Bake for 15 minutes and serve warm with a little butter and jam.  Delish!


Thursday, 26 August 2010

ANZACS

These traditional Australian biscuits are one of my very favourites!  Originally made to send overseas to the Australian and New Zealand Army Corps serving in Gallipoli, they are now an iconic Australian treat which come out more often then just Anzac Day (April 25th)!  The trick to a good Anzac biscuit is get them crunchy on the outside and chewy on the inside... Good luck!

Cooking Time: 8-10 mins
Preperation Time: 15 mins
Serves: 20

Ingrediants:
 - 85g porridge oats
 - 85g desiccated coconut
 - 100g plain flour
 - 100g castor sugar
 - 100g butter
 - 1tbs golden syrup
 - 1tsb bicarb soda

Method:
1)  Heat oven to 180C (fan 160C) / gas 4.

2)  Put the oats, coconut, flour and sugar in a bowl.

3)  Melt the butter in a small pan and stir in the golden syrup.

4)  Add the bicarbonate of soda to 2 tbsp boiling water, then stir into the golden syrup and butter mixture.

5)  Make a well in the middle of the dry ingredients and pour in the butter and golden syrup mixture. Stir gently to incorporate the dry ingredients.

6)  Put dessertspoonfuls of the mixture on to buttered baking sheets, about 2.5cm/1in apart to allow room for spreading.  (They spread quite a bit)

7)  Bake in batches for 8-10 mins until golden. Transfer to a wire rack to cool.

KISS ME Biscuits!

As i'm getting ready to move back to my hometown of Tasmania from 5 years living in London, I've noticed I have a lot of cooking ingredients that need to get used up before I leave... I'd hate to see them go to waste you see. (Any excuse to bake!) So... what is one to do??  I had flour, castor sugar, a drop of vanilla and a big jar of sprinkles!  Hmmm... KISS ME biscuits come to mind!  An easy-peasy faultless recipe, and a favourite with those who are young at heart!

Preparation Time: 40 minutes
Cooking Time: 10 minutes
Serves: 25

Ingredients:
 - 1 Cup caster sugar
 - 200g butter
 - 1tsb vanilla essence
 - 3 cups plain flour
 - 1 tsp Bicarb soda
 - 2 eggs
  - (optional - 1/2 cup raspberry jam)

Icing:
 - 2 cups icing sugar
 - 1-2tbs water
 - pink food colouring (optional)
 - 100's & 1000's sprinkles

Method:
1)  Preheat oven to 180'C

2)  Place sugar and butter in a bowl and mix with an electric beater until well combined

3)  Add flour, vanilla, bicarb and eggs

4)  Mix and knead with your hands until you form a slightly tacky dough

5)  Wrap in cling film and refrigerate for 30 minutes

6)  Line baking trays with baking paper

7)  Lightly flour a clean work surface and roll out your dough to about 5mm thick

8)  Cut out with a cookie cutter of your choice and place on your baking tray, leaving about 2mm space in between cookies

9)  Bake for about 10 minutes, or until the cookies start to colour slightly.  Remove from the oven and allow to cook completely before icing

10)  You can either ice them as they are (like i did) or you can match them into similar sized pairs and stick them together with a little jam.  Ice on top as normal!  Have FUN!